What is Open Source Software?

If you have been reading my previous posts, you may have noticed that I often direct people to various pieces of software.  I have pointed readers to a number of downloads, and keep a list of recommended pieces of software.  All of the software I recommend is free.  Some of the downloads I suggest, like CCleaner or Malware Bytes have both paid and free versions.  However, most of the software I recommend is open source software.  Open source software is almost always free, but this is not a requirement.

So what is the difference between open source software and other software?  Open source software is unique because the code (which is often called the source code) is available for anyone to access or modify to suit their needs.  Most commercial software is proprietary, which is also called closed source, which means that it can only be modified by the team that created the original work.  Open source software allows anyone to access the code and modify it.  Open source projects are usually highly collaborative efforts with many coders.  Open source software does have licenses, just as most other software, that prohibits users from doing things like selling the code.  However, users can make their own additions and are encouraged to, or in some cases required to, share those changes with others.  This often creates excellent programs that can compete with their closed source counterparts.

File Compression Or How to Zip and Unzip Files

This is another post in my series on essentials of dealing with files.  In this post I will be talking about file compression and how to zip and unzip files.  Compressing files is very useful when sharing files over a medium that has an upload limit.

All files stored on a computer have a specific size, which is usually given in bytes.  However, there are times when you would prefer files to be smaller.  For example, many email clients will only allow you to send files of a particular size.  This is a problem if you want to send larger files.  One solution to this is by using file compression.  This packages the files and makes them smaller.  However, in order to use the files they must first be unpacked.  There are many different types of compression software and many different compressed file types.  There are some differences, but most compressed files behave very similarly.  Compressed files can be identified by their file extension.  Common file extensions include “.7z”, “.rar”, “.tar” or “.zip”.  The most commonly used type is a “.zip” extension.  In order to unpack the file you need the proper software.  A Windows computer has the capacity to compress and decompress zip files preinstalled, but to use other types you will probably need to download software.  One of my favorite file compression tools is the open source tool 7-Zip, which has the capacity to handle many different types of file compression.  You can download it for free here.

If you are simply using zip files, you can use the software that is preinstalled on Windows computers to compress and decompress your files.

If you would like, you can follow along on your computer, just pick out some files that you would like to try zipping up.  There are many different methods that you can use, but I rather like this one.  You may wish to experiment a bit to see which methods you like best.

To Zip a File:

Start by finding some files that you want to compress. For this demo, I will be using some files I just created, but you can use any files you like.

Capture

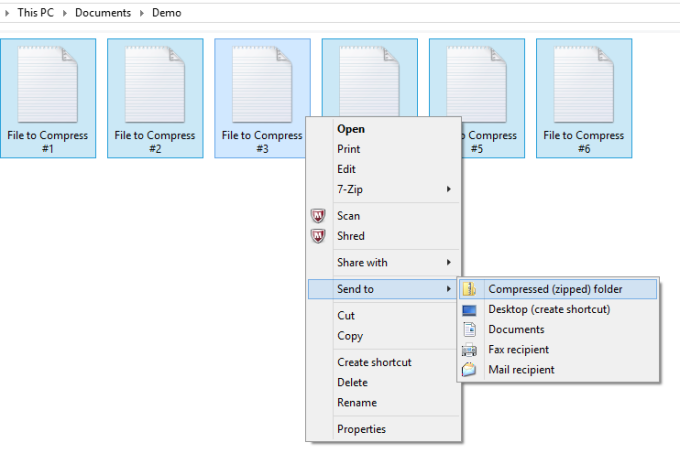
Next, select all of the files that you want to compress.  To select more than one file, just hold down the Ctrl key before clicking on the file.  Then right click while the files are selected and click “Send to” and then click “Compressed (zipped) folder”.  Depending on your version of Windows these commands may look slightly different.  This creates a new folder that is “zipped”.  You may need to rename it, as it is by default named after one of the selected files.
Screenshot (1)

You may notice on the screenshot, that there is also an option to select 7-Zip.  That is my favorite downloaded compression tool and it is used in a very similar manner.

Either tool creates a single compressed file that can be transferred far more easily than the original files.

Unzipping a File

Extracting a compressed file is just as easy as compressing a file.  If you using a zip file, you can use the preloaded software on Windows, but if you are using another type you need software.

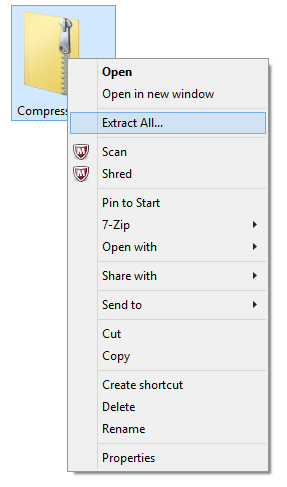
When extracting the files from a zipped folder, first select the folder.  Then, right click and select “Extract all”.
Screenshot (4)

Next, you need to select a destination file.  When you extract files, you create a new folder that contains the extracted files.

CaptureAfter that, you can access the contents of the file as you would normally.

I hope you enjoyed this tutorial, and please post other topics for me in the comments area!
Image Creation and Editing Introduction

This post is the introduction to a larger topic on photo editing.  I will be talking briefly about my preferred tools for working with photos and where to find them.  I will be posting many short how to pieces on doing particular tasks using a photo editor in the future.  For my first tutorials, I will be focusing on using an editor for specific tasks, for example, brightening a photo, removing a bad spot, or fixing the color.

My prefer using open source software over commercial versions for demonstrations.  It is easy to find and widely available.  For my photo tutorials, I will be using GIMP which is an open source version of Photoshop.  You can download it here.  It is my favorite software for working with bitmap images.  For working with vector graphics I prefer Inkscape, which is an open source version of Adobe Illustrator.  You can download it at this link.  For my discussion on what vector graphics are, and how they differ from bitmaps, please click on this link.

For my photo editing tutorials, I am including an image for you to manipulate.  You may download the image and follow along on your own computer.

I hope you enjoy my tutorials!

Recycling Bin and Recovery — Or Why Simply Hitting “Delete” Isn’t Enough

This is another post in my discussion of managing stored files.  In this post, I will be talking a bit about deleting files and the difference between sending a file to the recycling bin and actually getting rid of it.  This is very basic, but extremely useful if you are like me and sometimes delete more than you want to.

You make like to follow along on your own computer here.  I am using a Windows computer, so some of instructions may be a bit different if you are using another type of operating system.

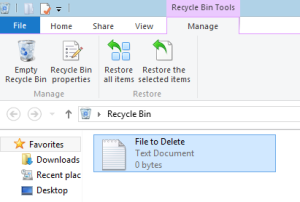
Start off by opening your file explorer, and select a file that you don’t mind deleting.  Right click it and select “Delete” or tap the “Delete” key on your keyboard.  Your computer will probably, depending on your settings, show you a prompt that asks if you really want to delete the file.  Allow it to delete the file, and it should disappear.  However, the file is not really removed from your computer.  Go to your desktop and open up your “Recycle Bin”.  The file you just removed should be sitting in there.  If you changed your mind and don’t want to delete the file, you can restore the file from here.

Capture

If you tap “Restore all Items”, all the files in the bin return to their original locations.  If you only want to restore a few things, select them and the click “Restore the selected items”.

As you can see, anything in the recycling bin can be restored with a few clicks.  However, you may want to actually get rid of some files, particularly if you are trying to free space on your hard drive.  In order to do that you need to empty the recycle bin.  The easiest way to do this is to simply use the button.  Once this is done, all the files that are in the recycling bin are, to some level, actually removed from your computer.  It may be possible to retrieve them using backups or system restore techniques, but this is one of the most commonly used ways to clear files.

One last note, some automated tools empty your recycle bin for you.  For example, I use a free tool called CCleaner, which in addition to several other tasks empties my recycling bin.