File Compression Or How to Zip and Unzip Files

This is another post in my series on essentials of dealing with files.  In this post I will be talking about file compression and how to zip and unzip files.  Compressing files is very useful when sharing files over a medium that has an upload limit.

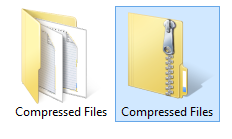
All files stored on a computer have a specific size, which is usually given in bytes.  However, there are times when you would prefer files to be smaller.  For example, many email clients will only allow you to send files of a particular size.  This is a problem if you want to send larger files.  One solution to this is by using file compression.  This packages the files and makes them smaller.  However, in order to use the files they must first be unpacked.  There are many different types of compression software and many different compressed file types.  There are some differences, but most compressed files behave very similarly.  Compressed files can be identified by their file extension.  Common file extensions include “.7z”, “.rar”, “.tar” or “.zip”.  The most commonly used type is a “.zip” extension.  In order to unpack the file you need the proper software.  A Windows computer has the capacity to compress and decompress zip files preinstalled, but to use other types you will probably need to download software.  One of my favorite file compression tools is the open source tool 7-Zip, which has the capacity to handle many different types of file compression.  You can download it for free here.

If you are simply using zip files, you can use the software that is preinstalled on Windows computers to compress and decompress your files.

If you would like, you can follow along on your computer, just pick out some files that you would like to try zipping up.  There are many different methods that you can use, but I rather like this one.  You may wish to experiment a bit to see which methods you like best.

To Zip a File:

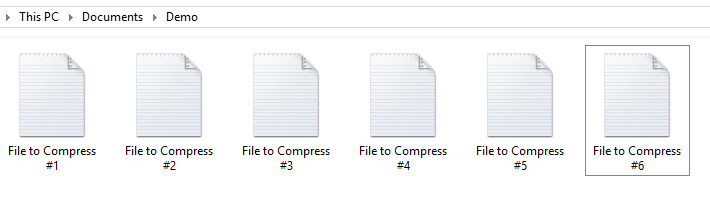
Start by finding some files that you want to compress. For this demo, I will be using some files I just created, but you can use any files you like.

Capture

Next, select all of the files that you want to compress.  To select more than one file, just hold down the Ctrl key before clicking on the file.  Then right click while the files are selected and click “Send to” and then click “Compressed (zipped) folder”.  Depending on your version of Windows these commands may look slightly different.  This creates a new folder that is “zipped”.  You may need to rename it, as it is by default named after one of the selected files.

Screenshot (1)

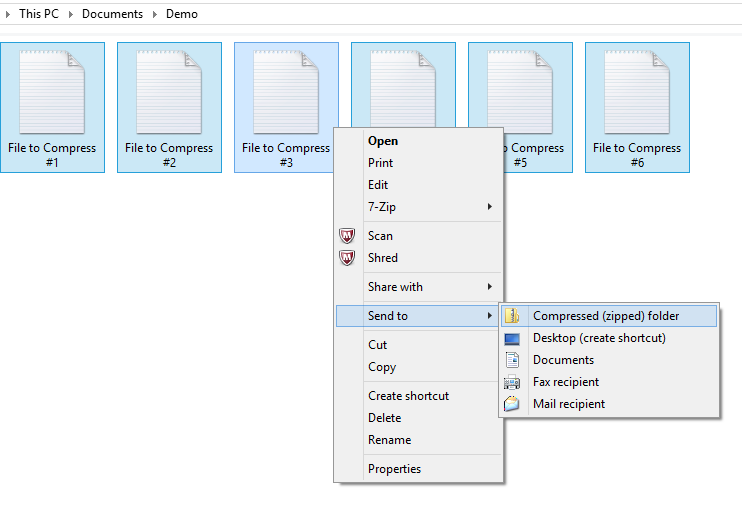
You may notice on the screenshot, that there is also an option to select 7-Zip.  That is my favorite downloaded compression tool and it is used in a very similar manner.

Either tool creates a single compressed file that can be transferred far more easily than the original files.

Unzipping a File

Extracting a compressed file is just as easy as compressing a file.  If you using a zip file, you can use the preloaded software on Windows, but if you are using another type you need software.

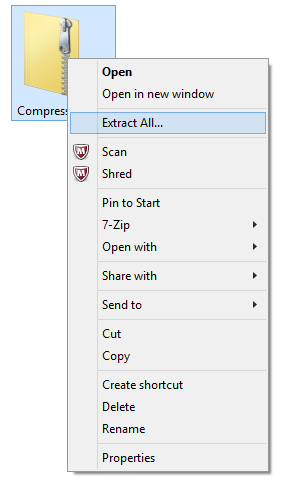
When extracting the files from a zipped folder, first select the folder.  Then, right click and select “Extract all”.

Screenshot (4)

Next, you need to select a destination file.  When you extract files, you create a new folder that contains the extracted files.

CaptureAfter that, you can access the contents of the file as you would normally.

I hope you enjoyed this tutorial, and please post other topics for me in the comments area!

Saving and Overwriting — Or What is Difference Between Save and Save As?

This post is dedicated to a very common mistake that can cause a great deal of frustration when made.  How many of my readers are familiar with this scenario, I know that I certainly am.  You open up a document in a word processor.  The document is very long and you decide that you want to make a shorter version to print out and save the long one for an electronic version.  You delete a lot of text, some figures and a few charts.  You think you are finished and so you go to save the document.  Here is where horrible mistakes are made.  You are distracted, you click “Save”, because that is what you do with documents, and go on about your day.  When you go to get the long version out to print, it is gone and in its place is the much shorter version that you just created.  You have just been a victim of an overwritten document. If you had clicked “Save As” you would have stored your shorter version under a new name and instead of losing your original you would have had two separate documents.  This is why the distinction between “Save” and “Save as” is so important.

When you save something, you are replacing whatever currently exists at that file location with what you are currently working on.  This is fine as long as you do not want to access the old version.  When you use “Save as” you are creating a new file location distinct from the original one.  This allows you to have more than one version of the same document.

When dealing with the scenario we discussed earlier, it is sometimes possible to retrieve overwritten documents.  Some software, such as Microsoft Word, allows you to access previous versions for just this purpose.  Also, you may use backups or various software to retrieve overwritten files.

I hope this is useful and thank you for reading!

Recycling Bin and Recovery — Or Why Simply Hitting “Delete” Isn’t Enough

This is another post in my discussion of managing stored files.  In this post, I will be talking a bit about deleting files and the difference between sending a file to the recycling bin and actually getting rid of it.  This is very basic, but extremely useful if you are like me and sometimes delete more than you want to.

You make like to follow along on your own computer here.  I am using a Windows computer, so some of instructions may be a bit different if you are using another type of operating system.

Start off by opening your file explorer, and select a file that you don’t mind deleting.  Right click it and select “Delete” or tap the “Delete” key on your keyboard.  Your computer will probably, depending on your settings, show you a prompt that asks if you really want to delete the file.  Allow it to delete the file, and it should disappear.  However, the file is not really removed from your computer.  Go to your desktop and open up your “Recycle Bin”.  The file you just removed should be sitting in there.  If you changed your mind and don’t want to delete the file, you can restore the file from here.

Capture

If you tap “Restore all Items”, all the files in the bin return to their original locations.  If you only want to restore a few things, select them and the click “Restore the selected items”.

As you can see, anything in the recycling bin can be restored with a few clicks.  However, you may want to actually get rid of some files, particularly if you are trying to free space on your hard drive.  In order to do that you need to empty the recycle bin.  The easiest way to do this is to simply use the button.  Once this is done, all the files that are in the recycling bin are, to some level, actually removed from your computer.  It may be possible to retrieve them using backups or system restore techniques, but this is one of the most commonly used ways to clear files.

One last note, some automated tools empty your recycle bin for you.  For example, I use a free tool called CCleaner, which in addition to several other tasks empties my recycling bin.

File Storage — Or Where Do You Store Your Stuff?

Good file management is very important to getting the most out of your computer.  There is a lot more to it than simply stuffing everything in your documents folder.  If you frequently use a word processor, work with photos, use spreadsheets or download anything you are constantly storing files on your computer.  The goal of this discussion is to help you understand where and how things are stored and to be able to adjust the storage method to make the best use of it.  This is not a technical discussion on various forms of storage, but an introduction to several basic storage methods and some pros and cons of each.

Most people have had at least one incident where a file is saved somewhere that is hard to access or lost it altogether. It is extremely frustrating to try to start working on a task and not be able to find the files that you need.  It is even more frustrating to work for hours on a project and then lose your work because you cannot find the file anymore.  So we are going to begin with a very simple issue- where are the files stored?  To explain that, I will be talking a bit about local v. external storage and what exactly is “the cloud”.

First, we will be talking about storing things on your local hard drive.  This is storage that is included on your computer.  If you have ever heard anyone talk about the size of their hard drive, this is what they are talking about.  In essence, the size of the hard drive controls how much “stuff” you can store on the computer.  There are advantages and disadvantages to storing things on the hard drive.  The biggest advantage is also the biggest potential problem.  The files exist on the machine.  The advantage is that you can access your files as long as you have access to your computer.  It does not matter if the internet is unavailable as long as you have your computer you can access your stuff.  That is also the big problem.  If your computer gets a virus, gets stolen, wet or smashed your files may be gone too.  You may be able to recover some of the files with some help from an expert or a removable hard drive but this is not guaranteed.  I have had a computer get a virus and permanently lost things.  This is why many people choose to make external back ups, just in case.

The second major type of storage is called external storage.  It consists of CDs, DVDs, portable hard drives, flash drives, and anything else you can think of that can store data.  They really all perform the same basic function.  You can store your files on these, rather than on your computer’s hard drive. This also allows you to move the files around.  If you want to move a file from one computer to another, you can store the it on a flash drive and access it from where you have the flash drive plugged in.  There are a lot of advantages to using removable storage, but there are some problems too.  Files stored on external drives are not taking up space on your computer, and are protected from being damaged if something happens to your machine.  However, all of these storage devices can fail themselves.  CDs, DVDs, hard drives and flash drives, can be corrupted by viruses, lost, fail, damaged by magnets or simply physically destroyed.

The last major type of storage I will be talking about has only become popular recently.  It is called cloud storage.  Cloud storage is a very popular buzzword, and you may have things stored in the cloud and don’t even realize it. Cloud storage, essentially, is files and information that is kept in another physical location and accessed remotely.  You upload a file to the cloud, it is stored on a server in some location and you access it from anywhere you are logged in.  Google Drive and Dropbox are popular cloud storage services.  Microsoft has their own paid cloud storage as do various other companies.  Some companies like Amazon or Google store things like pictures taken on their devices in the cloud.  You take a picture on an Android phone and it is uploaded to the cloud and can be accessed from anywhere you can access your Google account.  Cloud storage is great for convenience as the files are accessible from anywhere and are generally protected from things like a dropped or corrupted device.  However, you probably still want to keep local copies of important things.  If the internet is unaccessible or the service closes you do not want to lose your stuff.

So which one is best?

My answer, all of them.  For anything important, I like to store it in more than one place, because they are all vulnerable in different ways.  You need to experiment to find what works best for you depending on the project.